Azure Blob Storage is the place where you can store everything.
- Your files
- Images
- Videos
- Audio
Anything 1 and 0. Although you will not do that with the experience you get with the seasoning, keep in mind that the blob storage can do that.
Before going to create the blob,
For those who are new to the gang, you can officially join the best Azure Masters gang on Earth by Subscribing below.
Subscribe to my channel. Thanks! ❤️
Blob storage is one of the services provided by the Azure storage accounts.
- Files
- Blobs
- Tables
- Queues
Therefore, in order to create a Blob, we have to create a storage account first.

Creating a Storage account is a straightforward thing. Search for the “Storage Account” in the Azure portal and select the highlighted one, — not the classic one.
🍃 Then click on Create.

🍃 The portal will redirect you to the Storage account creation page. It will look like this.

🍃 The next step is filling above inputs. Select the Azure subscription you have. In my case, it’s the “Azure for students” subscription.
🍃 Select the Resource group we created in the previous episode.
🍃 Give a meaningful name to your Storage account. It may be like “storagestudents”.
Keep in mind that the field can contain only lowercase letters and numbers. The name must be between 3 and 24 characters.
🍃 Select the region. (Again don’t worry too much about the region. We will master them in future episodes).
1. Storage accounts will cost you per month and usage.
2. The cost will also vary with the region we use.
3. We will delete this storage account after using it for now.
🍃 Keep all the other details as default and go to the Advance tab.
🍃 Put a tick on “Allow enabling anonymous access on individual containers”.

🍃 Hit “Review + Create”.
🍃 Hit “Create”.
Tada! You have created your first-ever Storage account in Azure. Now it’s time to create the Blob Storage.

Now you have done with the basic steps, let’s go straight to create the Blob Storage. Click the “Go to Resource” button to navigate to the created Storage account.

Inside the created Storage account, you will have the option to choose between Files, Blobs, Queues, and Tables.
🍃 Let’s go with Blob Service. You can also see this in the sidebar as “Containers” (I don’t know why the hell they named the same service by two names).
But they both are the same. Click it.

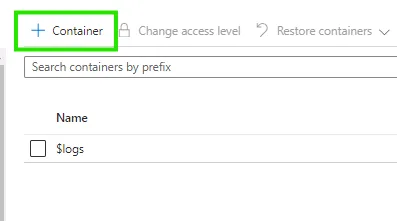
On the next page, click on the Container.

🍃 Give a proper and meaningful name as I say always.
🍃 Choose the “Blob (anonymous read access for blobs only).
🍃 Hit “Create”.

Congratulations, You have completed creating a Blob Storage! You are one step closer to mastering Azure Fundamentals.

Although we created the Storage account and Blob Storage, it’s better to remove it as soon as possible because it will cost your subscription. So, you can continue practicing Azure without any cost concerns.
Since the blob storage is inside the storage account, you can delete both resources by simply deleting the Storage account.

🍃 Go to the Storage account and click on “Delete”
🍃 If you can’t find it, go to Home and then choose the:
Resource Group → Storage Account.
But what if you got this message😧And now it will cost you.

You will find the solution in — Azure Resource Locks

Subscribe to my channel. Thanks! ❤️


